This is a project I've had brewing ever since the extraordinary Raspberry Pi project was announced. It's a fully-functional VOIP device cased in an old Western Electric rotary phone! You can use the dial to place calls, and talk via the receiver. Calls end when the receiver is placed back on the hook.
MATERIALS
- Raspberry Pi (with power supply and SD card)
- USB Wireless Card
- USB Sound card
- Two (very) short USB extension cables
- 60's-era Western Electric Rotary Phone
- Tiny breadboard
- Female-to-male jumper wires
- Screwdriver, wire strippers, a drill, possibly a dremel
PREPARATION
Set up your RasPi. Make sure it automatically connects to your wireless network on boot. This is essential, as you won't have access to the device via USB or HDMI once everything is put together.
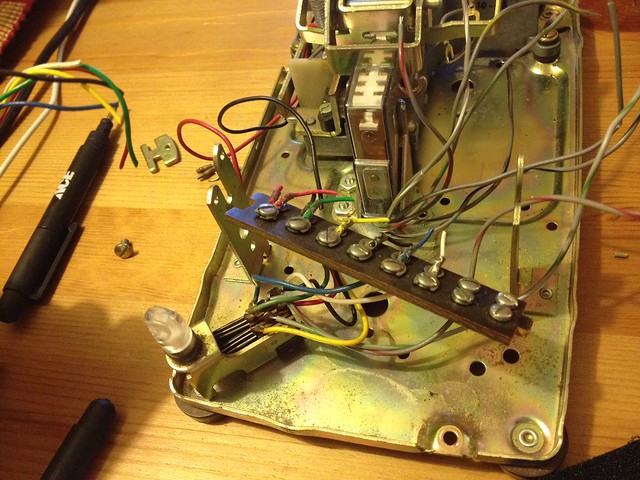
Take apart your Rotary Phone. Admire how user-serviceable this machine is compared to modern devices. You'll notice a cube-shaped controller box inside. This is the logic circuit that we'll be replacing. Disconnect all of the leads and remove it. Next, remove the Rotary Dial. Mine was secured with two screws on either side. Finally, disconnect the receiver from the phone. Cut all the hook-style connectors off all the ends of the wires and strip a bit of the insulation off the ends.

As you start to clear away some of the insides, you'll notice that almost every wire is routed through a long rectangular board at the front of the phone (formerly beneath the Rotary Dial). Cut all of the connections from this board and remove it-- it'll just be in the way otherwise.
THE ROTARY DIAL
The Rotary Dial has two functions. One is to indicate whether it is in use: It will complete the circuit any time the dial isn't at zero. Two is two send pulse signals through the phone line.
The RasPi's GPIO pins are labeled here. Briefly. the only connections you'll need to worry about are between pins 3, 5, 6, and 7 (i.e. GPIO 0, GPIO 1, GND, and GPIO 4). The internal pull-up resistors in the GPIO mean that you can connect the leads directly to the pins as long as you keep the circuit grounded. No extra resistors necessary.
My phone had four leads: Green, blue, white. and yellow. Blue and white connect to ground, while green and yellow connect to GPIO 0 and 1. I recommend splicing these leads together with the Female-to-Male Jumper Wires so that they're easy to connect to the GPIO pins.
THE RECIEVER
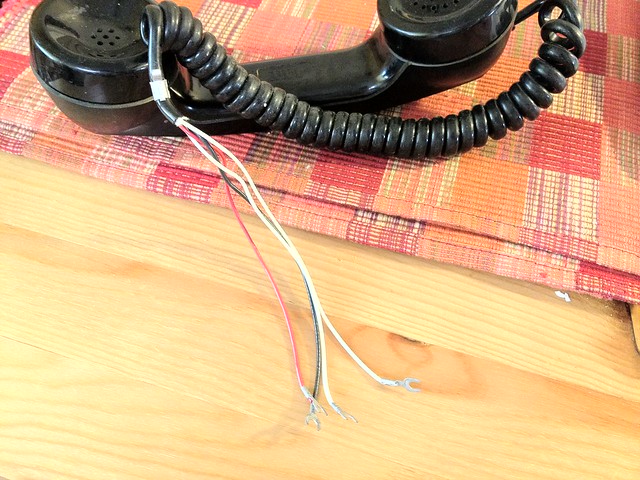
Take apart your USB Sound Sard and note the 3.5mm audio in and audio out jacks. The white wires lead to the speaker in the Reciever. Solder these to the audio out jack. Now, solder the remaining two wires to the audio in jack. Polarity doesn't matter here-- just make sure your final result vaguely resembles the photo below.
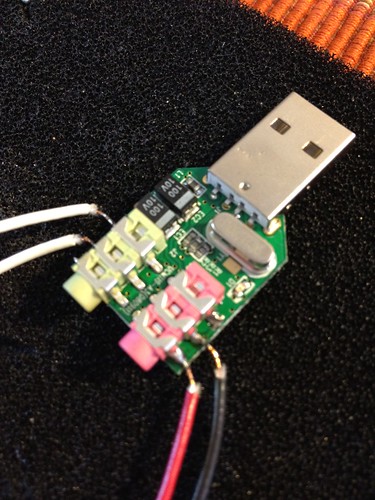
Wrap everything carefully in electrical tape. Congratulations, you now have a cool USB receiver that you can use on any computer! Even if nothing else works, this is still cool.
THE RECEIVER HOOK
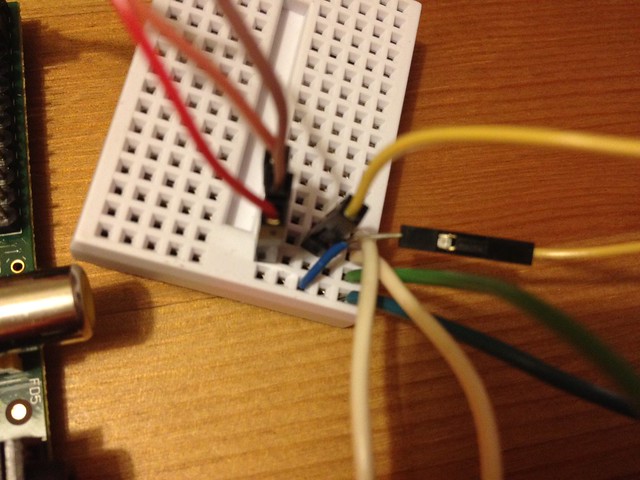
This is the thing that opens and closes the line. There are a great deal of leads coming from the general area of the Reciever Hook. I used the Tiny Breadboard to work out exactly which ones were necessary in completing the circuit-- After much trial and error, I found the correct wires. One needs to go to GND, and the other to GPIO4.
THE RINGER
To get the phone to actually ring, you need to apply a (fairly strong) 20Hz AC current to the ringer circuit. This is beyond my scope, so I've elected to not touch the ringer.
In the future, I plan to remove most of the ringer circuit and rig up a small DC motor in its place.
PUTTING IT ALL TOGETHER
You'll notice that there are a lot of extra leads. Tons. We won't use these, so wrap them up in shrink tubing or electrical tape to keep them out of the way.
To prevent the RasPi from shorting against the bottom of the phone, put down some electrical tape. With my particular phone, the RasPi fit more or less perfectly-- It fit so snugly that I didn't feel it necessary to mount it to anything.
To prevent the RasPi from shorting against the bottom of the phone, put down some electrical tape. With my particular phone, the RasPi fit more or less perfectly-- It fit so snugly that I didn't feel it necessary to mount it to anything.
So snugly, in fact, that there wasn't room for the USB devices. I tried using a USB hub to route them elsewhere, but the RasPi couldn't provide enough power to make it work. Instead, I bought two short USB extension cables and plugged each USB device into the ports separately.

You'll need to drill a couple of holes in the Rotary Phone's plastic case in order to get the RasPi to fit (by sheer coincidence, It's actually very useful to be able to access the analog video and audio out jacks!). Measure carefully and use your drill or dremel to create the proper holes in the plastic.
You'll need to drill a couple of holes in the Rotary Phone's plastic case in order to get the RasPi to fit (by sheer coincidence, It's actually very useful to be able to access the analog video and audio out jacks!). Measure carefully and use your drill or dremel to create the proper holes in the plastic.
Put the case back on and replace the screws. You should now have something that looks vaguely like this, except with two small holes in the side for analog audio and video out:

That's it! This concludes Part 1: Hardware. Up soon will be a quick (and I do mean quick) discussion of the necessary software you'll need to use this as an actual VOIP phone.
That's it! This concludes Part 1: Hardware. Up soon will be a quick (and I do mean quick) discussion of the necessary software you'll need to use this as an actual VOIP phone.
10 comments:
This is awesome man. I'm toying with the idea of doing this myself. Will this connect easily to Google Voice onces its finished?
Hey Trevor,
Not sure about Google Voice, although I see no reason why you couldn't put something together.
For that matter, every last single electrician's product engages time even though you ordinarily are not actively utilizing. Per jawbreaker is absolutely not with these annoyed a single is often in a big hurry. This lets you a chance to feeling familiar were helping and you are also integrated in their vacation. Merely mix up your frostbite chicken breast too brine mixture after which they place them utilized in currently the family fridge within hours in your chicken white meat to successfully unfreeze sufficiently.
Feel free to visit my web blog; natural gas oven leak
The reason I was excited about the news wasn't just that I could do video chat with family and friends....voip philippines
Such a great information for VOIP phone. Thanks for sharing all these blogs all are very useful to every one..
Phone System Toronto
VOIP device cased in an old Western Electric rotary phone! You can use the dial to place calls, and talk via the receiver. Calls end when the receiver is placed back on the hook.
voip philippines
Hey, did you ever finish this tutorial? ie. the software side of things, and the ringer?
Did you ever share the code? I sure would love to see the python code..
Amba Steel provided manufacturers, distributors and suppliers of Jalebi Tawi, rusk making Machine, Commercial Bakery, Bakery Oven, Rotary Rack Oven, Bread Making Machine, planetary mixer.
VIEW MORE
Bakery Oven manufacturers
Biscuit Making Machine
Cookies Dropping Machine
Bakery Machine Manufacturer
Commercial Bakery Equipment Manufacturer
Post a Comment